Building Phone Apps with React Native and Amazon AWS Services
React Native, coupled with Amazon services such as GraphQL and Amplify, provides a powerful combination for developing cross-platform phone apps efficiently. In this blog post, we’ll explore how you can leverage these technologies to create robust and feature-rich applications.
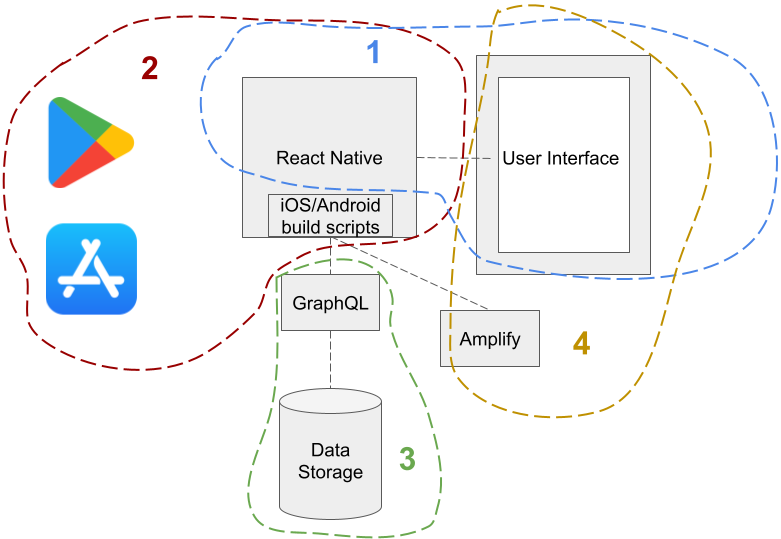
This blog post is intentionally kept high level and you can dive deeper into each area by following the provided links under each section. The diagram below shows different steps/modules involved in building and publishing apps and the corresponding section in this blog post.

1. Getting started with React Native
One of the significant advantages of using React Native is its ability to develop applications that run on both iOS and Android platforms. By utilizing a single codebase, you can save time and effort by avoiding the need to develop separate apps for each platform. React Native achieves this by rendering native components using JavaScript and provides a bridge to access device-specific APIs.
To get started with React Native, you’ll need to have Node.js and npm (Node Package Manager) installed on your machine. Once set up, you can use the React Native CLI to create a new project and start building your app. React Native provides a rich set of UI components and allows you to write code in JavaScript, making it accessible for developers familiar with web development.
Read more about React Native, how to get started, organize your code, and basic packages you can use for building your UI here.
2. Building a package, publishing on Google Play and Apple App store
To build and test a React Native package, after creating your project follow these steps:
- For Android:
- Open the project in Android Studio.
- Ensure that your Android device is connected or start an Android emulator.
- Build and run the Android project to verify everything is set up correctly.
- For iOS:
- Open the project’s ios directory in Xcode.
- Make any necessary changes to the project configuration, such as adding dependencies or adjusting build settings.
- Build and run the iOS project to ensure it’s working as expected.
Read more about building your app and publishing it to Apple App Store or Google Play here.
3. Storing Data, Updating, and Searching with GraphQL
GraphQL is a powerful query language for APIs that allows you to define and request the exact data you need. It provides a flexible and efficient way to interact with your backend services, making it an excellent choice for storing data, updating records, and performing searches within your mobile app.
To integrate GraphQL into your React Native app, you can use libraries such as Apollo Client or AWS Amplify. These libraries provide seamless integration with GraphQL and enable you to send queries and mutations to your GraphQL API effortlessly.
When using GraphQL, you define a schema that represents the structure of your data. This schema acts as a contract between the client and server, ensuring that both sides understand the expected data shape. You can then write queries and mutations to fetch and modify the data stored on your server.
GraphQL’s flexible nature allows you to request only the specific data fields you need for a particular screen or component. This feature, known as “fetching only what you need,” helps minimize the data transferred over the network and improves the performance of your app.
Additionally, GraphQL’s powerful filtering and searching capabilities enable you to perform complex searches and retrieve precisely the data your app requires. With its ability to nest queries, you can efficiently fetch related data in a single round trip, reducing the number of requests made to the server.
Read more about how you can add GraphQl to your project, define your data schema and support data storage/manipulation/querying here.
4. Authentication Support with AWS Amplify
User authentication is a critical aspect of many mobile applications. AWS Amplify simplifies the implementation of authentication functionalities, such as user sign-up, sign-in, and session management, by providing a comprehensive set of tools and services.
To leverage Amplify in your React Native app, you need to install the AWS Amplify CLI, which allows you to configure and manage your Amplify project. Once set up, you can easily add authentication to your app by executing a few simple commands.
Amplify supports various authentication mechanisms, including username/password, social sign-in, and federated identity providers like Amazon, Facebook, or Google. It handles the entire authentication flow, including secure storage of user credentials, token management, and authorization checks.
By integrating Amplify into your React Native app, you can save significant development time and ensure robust security practices without reinventing the authentication wheel.
Read more about how you can add authentication support to your app with Amplify and customize the authentication flow here.
Summary
React Native, combined with Amazon services like GraphQL and Amplify, provides a powerful toolkit for building phone applications. With React Native, you can develop apps that run on both iOS and Android platforms, reducing development time and effort. GraphQL enables efficient data storage, updates, and searches, empowering